        StringBuffer _sb = new StringBuffer();

        try {
            URL _url = new URL("http://dev.freecatz.pe.kr:8080/web/sample2");
            URLConnection _conn = _url.openConnection();
            InputStream _is = _conn.getInputStream();
            InputStreamReader _isr = new InputStreamReader(_is, "UTF-8");
            BufferedReader _br = new BufferedReader(_isr);

            String _temp;
            while((_temp = _br.readLine()) != null){
             _sb.append(_temp + "\r\n") ;
            }
            System.out.println(_sb.toString()) ;

        } catch (MalformedURLException mf) {
         mf.printStackTrace();
        } catch (IOException ioe) {
         ioe.printStackTrace();
        }
2017년 9월 11일 월요일
[JaVa] URL 읽어 들이기
2017년 8월 14일 월요일
[EtC] Linux 에 redis 설치 및 설정
1. redis 설치
공식 홈페이지 : https://redis.io/download
1-1. redis 다운로드 및 컴파일
[redis@localohst ~]$ wget http://download.redis.io/releases/redis-3.2.9.tar.gz[redis@localohst ~]$ tar xzf redis-3.2.9.tar.gz
[redis@localohst ~]$ cd redis-3.2.9
[redis@localohst redis-3.2.9]$ make
1-2. 주요 명령어 사용을 위한 PATH 설정
redis-cli, redis-server 명령어의 경우 redis 압축 해제후 make 한 디렉토리 아래 src 에 위치 하고 있다.어느 위치에서든 사용 가능 하도록 PATH 로 잡아 주도록 한다.
[redis@localohst redis-3.2.9]$ vi ~/.bashrc
export JAVA_HOME=/usr/local/jdk1.8.0_121
export REDIS_HOME=/home/freecatz/redis-3.2.9/src
export PATH=$PATH:$JAVA_HOME/bin:$REDIS_HOME
2. redis 설정
[redis@localohst redis-3.2.9]$ cp ./redis.conf ./redis.conf.ori[redis@localohst redis-3.2.9]$ vi redis.conf
bind 0.0.0.0
protected-mode no
port 6379
timeout 0
logfile "/home/freecatz/redis-3.2.9/logs/redis.log"
requirepass myPassword
3. redis 실행 및 종료
3-1. redis 실행
[redis@localohst redis-3.2.9]$ redis-server ./redis.conf --protected-mode no &3-2. redis 실행 확인
[redis@localohst redis-3.2.9]$ redis-cli127.0.0.1:6379> auth myPassword
OK
127.0.0.1:6379> ping
PONG
3-3. redis 종료
[redis@localohst redis-3.2.9]$ redis-cli127.0.0.1:6379> auth myPassword
OK
127.0.0.1:6379> shutdown
11725:M 14 Aug 11:48:56.727 # User requested shutdown...
11725:M 14 Aug 11:48:56.727 * Saving the final RDB snapshot before exiting.
11725:M 14 Aug 11:48:56.732 * DB saved on disk
11725:M 14 Aug 11:48:56.732 * Removing the pid file.
11725:M 14 Aug 11:48:56.732 # Redis is now ready to exit, bye bye...
not connected> exit
[1]+ Done redis-server ./redis.conf --protected-mode no
[redis@localohst redis-3.2.9]$
2017년 6월 21일 수요일
[EtC] Linux 에 nginx 설치 및 설정
Environment
- Ubuntu 14.x
- nginx 1.12.0
- spring boot 1.5.3 : executeable jar deploy(using embeded undertow)
nginx 공식 사이트 : http://nginx.org/en/download.html
# 컴파일시 필요한 의존성에 걸린 패키지들을 설치 한다.
root@freecatz:~# apt-get install openssl openssl-devel pcre pcre-devel zlib zlib-devel
root@freecatz:~# wget http://nginx.org/download/nginx-1.12.0.tar.gz
root@freecatz:~# tar zxvf nginx-1.12.0.tar.gz
root@freecatz:~# cd nginx-1.12.0
root@freecatz:~# ./configure --prefix=/usr/local/nginx-1.12.0 --with-http_ssl_module --with-http_v2_module --with-openssl=/root/archive/openssl-1.0.2l
* 참고 : --with-openssl 옵션을 적용하는 경우 openssl 의 소스 경로를 넣어 주어야 한다.
root@freecatz:~# make && make install
root@freecatz:~# cp /usr/local/nginx-1.12.0/conf/nginx.conf /usr/local/nginx-1.12.0/conf/nginx.conf.ori
# 설정 파일 편집
root@freecatz:~# vi /usr/local/nginx-1.12.0/conf/nginx.conf
worker_processes auto;
events {
worker_connections 1024;
use epoll;
multi_accept on;
}
http {
# 보안을 위해 서버 버전 정보 노출을 막는다.
server_tokens off;
sendfile on;
client_max_body_size 10M;
... 중략 ...
upstream undertow {
ip_hash;
server 127.0.0.1:8080 weight=1 max_fails=3 fail_timeout=5s;
server 127.0.0.1:8081 weight=1 max_fails=3 fail_timeout=5s;
server 127.0.0.1:8082 weight=1 max_fails=3 fail_timeout=5s;
}
server {
listen 80;
server_name freecatz.pe.kr;
# return 301 https://$server_name$request_uri;
rewrite ^ https://$server_name$request_uri? permanent;
}
listen 443 ssl;
server_name freecatz.pe.kr;
ssl on;
ssl_certificate /etc/fullchain.pem;
ssl_certificate_key /etc/privkey.pem;
# 보안상의 이유로 SSLv2 SSLv3 은 사용 하지 않는 것이 좋다고 한다. TLSv1.3을 지원 하기 위해서는 OpenSSL 1.1.1 이상의 버젼이 필요 하다고 한다.
ssl_protocols
ssl_prefer_server_ciphers on;
ssl_ciphers 'EECDH+AESGCM:EDH+AESGCM:AES256+EECDH:AES256+EDH';
location / {
charset utf-8;
proxy_set_header Host $http_host;
proxy_set_header X-Real-IP $remote_addr;
proxy_set_header X-Forwarded-For $proxy_add_x_forwarded_for;
proxy_set_header X-Forwarded-Proto $scheme;
proxy_set_header X-NginX-Proxy true;
proxy_set_header X-Forwarded-Port $server_port;
proxy_connect_timeout 150;
proxy_send_timeout 100;
proxy_read_timeout 100;
proxy_redirect off;
proxy_pass http://undertow$request_uri;
} # location / end
} # server end
... 중략 ...
# nginx 설정 파일 테스트
root@freecatz:~# nginx -t
nginx: the configuration file /usr/local/nginx-1.12.0/conf/nginx.conf syntax is ok
nginx: configuration file /usr/local/nginx-1.12.0/conf/nginx.conf test is successful
root@freecatz:~# /usr/local/nginx-1.12.0/sbin/nginx
# nginx 종료
root@freecatz:~# /usr/local/nginx-1.12.0/sbin/nginx -s quit
# nginx 재시작
root@freecatz:~# /usr/local/nginx-1.12.0/sbin/nginx -s reload
2017년 5월 17일 수요일
[EtC] 한컴, 오픈소스 라이선스 위반...

<이미지를 클릭 하시면 원본 사이즈로 보실 수 있습니다.>
이번에 문제가 된 PDF 기능 입니다.
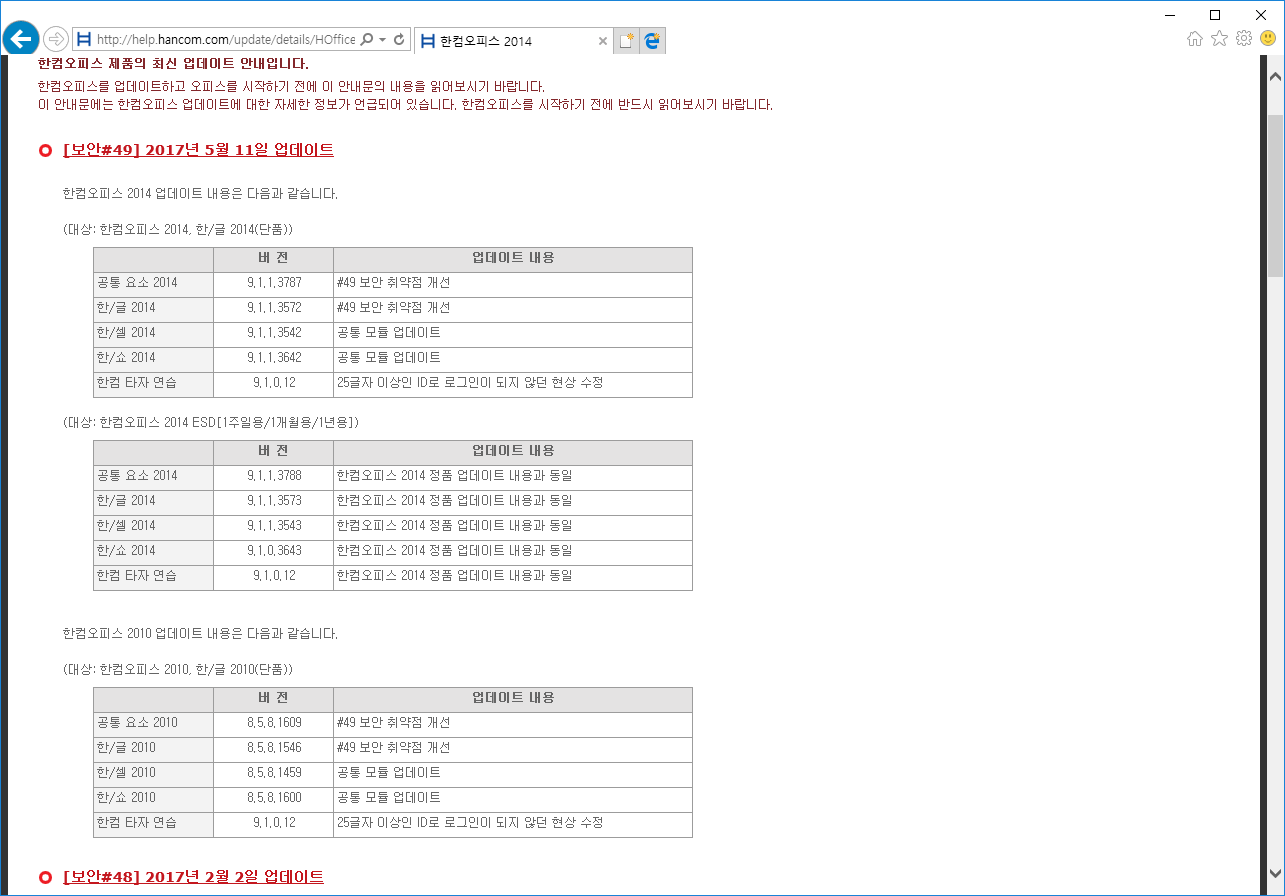
<이미지를 클릭 하시면 원본 사이즈로 보실 수 있습니다.>
업데이트 내역에는 PDF 관련 내용은 쏙 빠져 있습니다.

<이미지를 클릭 하시면 원본 사이즈로 보실 수 있습니다.>
해당 기사 입니다.
프로그램을 만들어서 판매 하는 회사가 타사의 라이브러리의 라이선스를 잘 알아 보지도 않고 가져다 쓰는 것도 참 아이러니 합니다.
정부기관, 기업, 회사에서 라이선스에 대해서 잘 알아 보지 않고 한컴 제품을 불법으로 쓴다면 한컴에서는 어떤 말을 할까요?
손에 꼽히는 국내 몇 안되는 개발사 인데 실망이 참으로 큽니다.
2017년 4월 11일 화요일
[EtC] SVN 서버 구성(SVN Protocol)
# apt-get install subversion
# useradd -r svn
# passwd svn
새 UNIX 암호 입력:
새 UNIX 암호 재입력:
passwd: password updated successfully
# su - svn
$ mkdir -p ~/repo/web
$ svnadmin create --fs-type fsfs /home/svn/repo/web
$ vi /home/svn/repo/web/conf/svnserve.conf
----- svnserve.conf 파일 내용 // -----
[general]
anon-access = none
auth-access = write
password-db = passwd
authz-db = authz
----- // svnserve.conf 파일 내용 -----
$ vi /home/svn/repo/web/conf/passwd
----- passwd 파일 내용 // -----
[users]
svnuser1 = P@ssw0rd
----- // passwd 파일 내용 -----
$ vi /home/svn/repo/web/conf/authz
----- authz 파일 내용 // -----
[/]
svnuser1 = rw
----- // authz 파일 내용 -----
서비스 등록
$ su -
암호:
# vi /etc/init/svnserve.conf
----- svnserve.conf 파일 내용 // -----
description "Subversion server"
start on (local-filesystems and net-device-up IFACE=lo and started udev-finish)
stop on runlevel [06]
chdir /home/svn
respawn
respawn limit 2 3600
exec /usr/bin/svnserve --foreground --daemon --config-file /home/svn/repo/web/conf/svnserve.conf --root /home/svn/
----- // svnserve.conf 파일 내용 -----
# initctl restart svnserve
2017년 4월 5일 수요일
[EtC] letsencrypt SSL 적용
- 테스트 환경
OS : Ubuntu 12.x 64Bit
https://letsencrypt.org/ 에서 무료로 발급해 주는 SSL 을 Apache 에 적용.
관리자 권한으로 아래의 명령을 실행 한다.
# apt-get install git python2.7
# mkdir SSL
# cd SSL
# git clone https://github.com/letsencrypt/letsencrypt
# cd letsencrypt
# ./letsencrypt-auto
Bootstrapping dependencies for Debian-based OSes...
무시http://ftp.daum.net trusty InRelease
기존 http://ftp.daum.net trusty-updates InRelease
기존 http://ftp.daum.net trusty-backports InRelease
... 중략 ...
Creating virtual environment...
Installing Python packages...
Installation succeeded.
Saving debug log to /var/log/letsencrypt/letsencrypt.log
Failed to find apache2ctl in PATH: /usr/local/jdk1.7.0_80/bin:/usr/local/apache-tomcat-7.0.63/bin:/usr/local/sbin:/usr/local/bin:/usr/sbin:/usr/bin:/sbin:/bin:/usr/local/apache-2.4.25/bin
Certbot doesn't know how to automatically configure the web server on this system. However, it can still get a certificate for you. Please run "letsencrypt-auto certonly" to do so. You'll need to manually configure your web server to use the resulting certificate.
apache 를 패키지로 설치 하지 않고, 컴파일 하여 설치 한 경우라 그런지 PATH 에서 apache2ctl 명령을 찾을 수 없다고 한다.
# ./letsencrypt-auto certonly
Saving debug log to /var/log/letsencrypt/letsencrypt.log
Failed to find apache2ctl in PATH: /usr/local/jdk1.7.0_80/bin:/usr/local/apache-tomcat-7.0.63/bin:/usr/local/sbin:/usr/local/bin:/usr/sbin:/usr/bin:/sbin:/bin:/usr/local/apache-2.4.25/bin
아래의 물음에서는 본인의 상황에 따라 선택 하여 입력 하도록 한다.
How would you like to authenticate with the ACME CA?
-------------------------------------------------------------------------------
1: Place files in webroot directory (webroot)
2: Spin up a temporary webserver (standalone)
-------------------------------------------------------------------------------
Select the appropriate number [1-2] then [enter] (press 'c' to cancel): 2
이메일 주소를 입력 한다. 해당 이메일 주소로 확인 메일이 발송 된다.
Enter email address (used for urgent renewal and security notices) (Enter 'c' to
cancel): YOUR_EMAIL_ADDRESS
-------------------------------------------------------------------------------
Please read the Terms of Service at
https://letsencrypt.org/documents/LE-SA-v1.1.1-August-1-2016.pdf. You must agree
in order to register with the ACME server at
https://acme-v01.api.letsencrypt.org/directory
-------------------------------------------------------------------------------
(A)gree/(C)ancel: A
-------------------------------------------------------------------------------
Would you be willing to share your email address with the Electronic Frontier
Foundation, a founding partner of the Let's Encrypt project and the non-profit
organization that develops Certbot? We'd like to send you email about EFF and
our work to encrypt the web, protect its users and defend digital rights.
-------------------------------------------------------------------------------
(Y)es/(N)o: Y
Please enter in your domain name(s) (comma and/or space separated) (Enter 'c'
to cancel): freecatz.pe.kr
Obtaining a new certificate
Performing the following challenges:
tls-sni-01 challenge for freecatz.pe.kr
Waiting for verification...
Cleaning up challenges
Generating key (2048 bits): /etc/letsencrypt/keys/0000_key-certbot.pem
Creating CSR: /etc/letsencrypt/csr/0000_csr-certbot.pem
IMPORTANT NOTES:
- Congratulations! Your certificate and chain have been saved at
/etc/letsencrypt/live/freecatz.pe.kr/fullchain.pem. Your cert will
expire on 2017-07-04. To obtain a new or tweaked version of this
certificate in the future, simply run letsencrypt-auto again. To
non-interactively renew *all* of your certificates, run
"letsencrypt-auto renew"
- Your account credentials have been saved in your Certbot
configuration directory at /etc/letsencrypt. You should make a
secure backup of this folder now. This configuration directory will
also contain certificates and private keys obtained by Certbot so
making regular backups of this folder is ideal.
- If you like Certbot, please consider supporting our work by:
Donating to ISRG / Let's Encrypt: https://letsencrypt.org/donate
Donating to EFF: https://eff.org/donate-le
2017-07-04 만료 된다고 나와 있다. 90일 이후에는 letsencrypt-auto renew 명령으로 연장 해야 한다. crontab 을 이용하여 매일 갱신을 시도 하여도 문제가 없다고 한다.
# vi /etc/crontab
------------- /etc/crontab 파일 내용 -------------
... 중략 ...
# m h dom mon dow user command
... 중략 ...
00 23 * * * root /root/letsencrypt/letsencrypt-auto renew
------------- /etc/crontab 파일 내용 -------------
# vi /usr/local/apache-2.4.25/conf/httpd.conf
LoadModule ssl_module modules/mod_ssl.so
LoadModule rewrite_module modules/mod_rewrite.so
* 위의 모듈들을 로드 할 수 있도록 주석 해제 한다.
# vi /usr/local/apache-2.4.25/conf/extra/httpd-vhosts.conf
OS : Ubuntu 12.x 64Bit
https://letsencrypt.org/ 에서 무료로 발급해 주는 SSL 을 Apache 에 적용.
관리자 권한으로 아래의 명령을 실행 한다.
# apt-get install git python2.7
# mkdir SSL
# cd SSL
# git clone https://github.com/letsencrypt/letsencrypt
# cd letsencrypt
# ./letsencrypt-auto
Bootstrapping dependencies for Debian-based OSes...
무시http://ftp.daum.net trusty InRelease
기존 http://ftp.daum.net trusty-updates InRelease
기존 http://ftp.daum.net trusty-backports InRelease
... 중략 ...
Creating virtual environment...
Installing Python packages...
Installation succeeded.
Saving debug log to /var/log/letsencrypt/letsencrypt.log
Failed to find apache2ctl in PATH: /usr/local/jdk1.7.0_80/bin:/usr/local/apache-tomcat-7.0.63/bin:/usr/local/sbin:/usr/local/bin:/usr/sbin:/usr/bin:/sbin:/bin:/usr/local/apache-2.4.25/bin
Certbot doesn't know how to automatically configure the web server on this system. However, it can still get a certificate for you. Please run "letsencrypt-auto certonly" to do so. You'll need to manually configure your web server to use the resulting certificate.
apache 를 패키지로 설치 하지 않고, 컴파일 하여 설치 한 경우라 그런지 PATH 에서 apache2ctl 명령을 찾을 수 없다고 한다.
# ./letsencrypt-auto certonly
Saving debug log to /var/log/letsencrypt/letsencrypt.log
Failed to find apache2ctl in PATH: /usr/local/jdk1.7.0_80/bin:/usr/local/apache-tomcat-7.0.63/bin:/usr/local/sbin:/usr/local/bin:/usr/sbin:/usr/bin:/sbin:/bin:/usr/local/apache-2.4.25/bin
아래의 물음에서는 본인의 상황에 따라 선택 하여 입력 하도록 한다.
How would you like to authenticate with the ACME CA?
-------------------------------------------------------------------------------
1: Place files in webroot directory (webroot)
2: Spin up a temporary webserver (standalone)
-------------------------------------------------------------------------------
Select the appropriate number [1-2] then [enter] (press 'c' to cancel): 2
이메일 주소를 입력 한다. 해당 이메일 주소로 확인 메일이 발송 된다.
Enter email address (used for urgent renewal and security notices) (Enter 'c' to
cancel): YOUR_EMAIL_ADDRESS
-------------------------------------------------------------------------------
Please read the Terms of Service at
https://letsencrypt.org/documents/LE-SA-v1.1.1-August-1-2016.pdf. You must agree
in order to register with the ACME server at
https://acme-v01.api.letsencrypt.org/directory
-------------------------------------------------------------------------------
(A)gree/(C)ancel: A
-------------------------------------------------------------------------------
Would you be willing to share your email address with the Electronic Frontier
Foundation, a founding partner of the Let's Encrypt project and the non-profit
organization that develops Certbot? We'd like to send you email about EFF and
our work to encrypt the web, protect its users and defend digital rights.
-------------------------------------------------------------------------------
(Y)es/(N)o: Y
Please enter in your domain name(s) (comma and/or space separated) (Enter 'c'
to cancel): freecatz.pe.kr
Obtaining a new certificate
Performing the following challenges:
tls-sni-01 challenge for freecatz.pe.kr
Waiting for verification...
Cleaning up challenges
Generating key (2048 bits): /etc/letsencrypt/keys/0000_key-certbot.pem
Creating CSR: /etc/letsencrypt/csr/0000_csr-certbot.pem
IMPORTANT NOTES:
- Congratulations! Your certificate and chain have been saved at
/etc/letsencrypt/live/freecatz.pe.kr/fullchain.pem. Your cert will
expire on 2017-07-04. To obtain a new or tweaked version of this
certificate in the future, simply run letsencrypt-auto again. To
non-interactively renew *all* of your certificates, run
"letsencrypt-auto renew"
- Your account credentials have been saved in your Certbot
configuration directory at /etc/letsencrypt. You should make a
secure backup of this folder now. This configuration directory will
also contain certificates and private keys obtained by Certbot so
making regular backups of this folder is ideal.
- If you like Certbot, please consider supporting our work by:
Donating to ISRG / Let's Encrypt: https://letsencrypt.org/donate
Donating to EFF: https://eff.org/donate-le
2017-07-04 만료 된다고 나와 있다. 90일 이후에는 letsencrypt-auto renew 명령으로 연장 해야 한다. crontab 을 이용하여 매일 갱신을 시도 하여도 문제가 없다고 한다.
# vi /etc/crontab
------------- /etc/crontab 파일 내용 -------------
... 중략 ...
# m h dom mon dow user command
... 중략 ...
00 23 * * * root /root/letsencrypt/letsencrypt-auto renew
------------- /etc/crontab 파일 내용 -------------
# vi /usr/local/apache-2.4.25/conf/httpd.conf
LoadModule rewrite_module modules/mod_rewrite.so
* 위의 모듈들을 로드 할 수 있도록 주석 해제 한다.
# vi /usr/local/apache-2.4.25/conf/extra/httpd-vhosts.conf
<VirtualHost *:80>
ServerName freecatz.pe.kr
ServerAdmin root@freecatz.pe.kr
RewriteEngine on
RewriteCond %{SERVER_NAME} =freecatz.pe.kr
RewriteRule ^ https://%{SERVER_NAME}%{REQUEST_URI} [END,QSA,R=permanent]
</VirtualHost>
<IfModule mod_ssl.c>
Listen 443
SSLProtocol ALL -SSLv2 -SSLv3
SSLCipherSuite ECDHE-RSA-AES128-GCM-SHA256:ECDHE-ECDSA-AES128-GCM-SHA256:ECDHE-RSA-AES256-GCM-SHA384:ECDHE-ECDSA-AES256-GCM-SHA384:DHE-RSA-AES128-GCM-SHA256:DHE-DSS-AES128-GCM-SHA256:kEDH+AESGCM:ECDHE-RSA-AES128-SHA256:ECDHE-ECDSA-AES128-SHA256:ECDHE-RSA-AES128-SHA:ECDHE-ECDSA-AES128-SHA:ECDHE-RSA-AES256-SHA384:ECDHE-ECDSA-AES256-SHA384:ECDHE-RSA-AES256-SHA:ECDHE-ECDSA-AES256-SHA:DHE-RSA-AES128-SHA256:DHE-RSA-AES128-SHA:DHE-DSS-AES128-SHA256:DHE-RSA-AES256-SHA256:DHE-DSS-AES256-SHA:DHE-RSA-AES256-SHA:!aNULL:!eNULL:!EXPORT:!DES:!RC4:!3DES:!MD5:!PSK
SSLHonorCipherOrder on
<VirtualHost *:443>
ServerName freecatz.pe.kr
ServerAdmin root@freecatz.pe.kr
<Proxy balancer://myCluster stickysession=JSESSIONID|jsessionid scolonpathdelim=On>
BalancerMember http://127.0.0.1:8080 route=1
BalancerMember http://127.0.0.1:8081 route=2
BalancerMember http://127.0.0.1:8082 route=3
</Proxy>
BalancerMember http://127.0.0.1:8081 route=2
BalancerMember http://127.0.0.1:8082 route=3
</Proxy>
ProxyRequests Off
ProxyPass / balancer://myCluster/
ProxyPassReverse / balancer://myCluster
SSLEngine on
SSLCertificateFile /etc/letsencrypt/live/freecatz.pe.kr/cert.pem
SSLCertificateKeyFile /etc/letsencrypt/live/freecatz.pe.kr/privkey.pem
SSLCertificateChainFile /etc/letsencrypt/live/freecatz.pe.kr/chain.pem
SSLCACertificateFile /etc/letsencrypt/live/freecatz.pe.kr/fullchain.pem
Header always set Strict-Transport-Security "max-age=15552000"
</VirtualHost>
</IfModule>
* 편의상 httpd-vhosts.conf 에 모든 내용을 넣었으나, 분리 하여도 된다.
https://www.ssllabs.com/ssltest 에서 SSL 테스트 진행 한다.
[EtC] Tomcat Manager 사용 가능 하도록 설정
# vi /home/tomcat/server/apache-tomcat-7.0.76_1/conf/tomcat-users.xml
<?xml version='1.0' encoding='utf-8'?>
<role rolename="manager-gui"/>
<role rolename="manager-script"/>
<role rolename="manager-status"/>
<user username="tomcat" password="P@ssw0rd1234" roles="manager-gui,manager-script,manager-status"/>
</tomcat-users>
# shutdown.sh
# startup.sh
http://<IP or Domain>/manager/html 에 브라우저로 접근 하여 확인 한다.
[EtC] Tomcat Session 끊기는 문제
- 테스트 환경 :
OS : Ubuntu 12.x 64Bit
WAS : Tomcat7.x 64Bit
한 서버에 여러대의 톰켓을 포트만 다르게 하여 서비스를 구동 할 경우 로그인 세션이 끊기는 현상이 발생 하게 된다. 이는 쿠키의 경우 도메인이나 IP 주소만 구분 하며, 포트 단위로 구분을 하지는 못하기 때문에 발생 하는 문제라고 한다.
이러한 경우 톰켓의 server.xml 에 sessionCookieName 속성을 추가 하여 구분 지어 준다.
<!-- 톰켓 1호기(8080포트 사용)의 server.xml -->
<Context className="org.apache.catalina.core.StandardContext"
... 중략 ...
sessionCookieName="JSESSIONID1"
... 중략 ...
</Context>
<!-- 톰켓 2호기(8081포트 사용)의 server.xml -->
<Context className="org.apache.catalina.core.StandardContext"
... 중략 ...
sessionCookieName="JSESSIONID2"
... 중략 ...
</Context>
참고 : http://lng1982.tistory.com/143
<Context className="org.apache.catalina.core.StandardContext"
... 중략 ...
sessionCookieName="JSESSIONID2"
... 중략 ...
</Context>
참고 : http://lng1982.tistory.com/143
2017년 3월 28일 화요일
[EtC] Apache, Tomcat Load Balancing & Session Clustering
아파치2.4 와 톰켓7.0 을 이용한 로드벨런싱, 세션 클러스터 환경 구성
1) 테스트 환경
- os : ubuntu 16.04 64bit
- java : 1.7.0_80
- apache : 2.4.25
- tomcat : 7.0.76
2) java 설치
# tar zxvf jdk-7u80-linux-x64.tar.gz -C /usr/local/
# ln -s /usr/local/jdk1.7.0_80/bin/java /usr/bin/java
3) Apach2.4 설치를 위한 APR, APR-util 및 의존 패키지 설치
* 아파치 2.4 버젼 부터는 APR 과 APR-util 을 따로 컴파일 하여 설치 하여야 한다고 한다.
http://apr.apache.org/download.cgi 에서 다운로드
3-1) APR 다운로드 및 컴파일, 설치
# wget http://apache.mirror.cdnetworks.com/apr/apr-1.5.2.tar.gz
# tar zxvf apr-1.5.2.tar.gz
# cd apr-1.5.2/
# ./configure
# make
# make install
3-2) APR-util 다운로드 및 컴파일, 설치
# wget http://apache.mirror.cdnetworks.com/apr/apr-util-1.5.4.tar.gz
# tar zxvf apr-util-1.5.4.tar.gz
# cd apr-util-1.5.4
# ./configure --with-apr=/usr/local/apr
# make
# make install
3-3) 의존 패키지 설치
# apt-get install libpcre3-dev
* RPM 기반의 CentOS7 의 경우 yum을 이용하여 pcre-devel 패키지를 설치 한다.
4) Apach2.4 설치(컴파일) 및 구동 테스트
# wget http://apache.mirror.cdnetworks.com/httpd/httpd-2.4.25.tar.gz
# tar zxvf httpd-2.4.25.tar.gz
# cd httpd-2.4.25
# ./configure --prefix=/usr/local/apache-2.4.25
# make
# make install
# /usr/local/apache-2.4.25/bin/apachectl start
* 브라우저를 이용하여 http://localhost 에 접속하여 본다.
# /usr/local/apache-2.4.25/bin/apachectl stop
5) Apach2.4 설정 파일 수정
# cp /usr/local/apache-2.4.25/conf/httpd.conf /usr/local/apache-2.4.25/conf/httpd.conf.ori
# vi /usr/local/apache-2.4.25/conf/httpd.conf
* 아래의 내용들을 찾아 주석 해제 한다.
LoadModule slotmem_shm_module modules/mod_slotmem_shm.so
LoadModule autoindex_module modules/mod_autoindex.so
LoadModule proxy_module modules/mod_proxy.so
LoadModule proxy_http_module modules/mod_proxy_http.so
LoadModule proxy_balancer_module modules/mod_proxy_balancer.so
LoadModule proxy_fcgi_module modules/mod_proxy_fcgi.so
LoadModule status_module modules/mod_status.so
LoadModule lbmethod_byrequests_module modules/mod_lbmethod_byrequests.so
LoadModule lbmethod_bytraffic_module modules/mod_lbmethod_bytraffic.so
LoadModule lbmethod_bybusyness_module modules/mod_lbmethod_bybusyness.so
LoadModule lbmethod_heartbeat_module modules/mod_lbmethod_heartbeat.so
# cp /usr/local/apache-2.4.25/conf/extra/httpd-vhosts.conf /usr/local/apache-2.4.25/conf/extra/httpd-vhosts.conf.ori
# vi /usr/local/apache-2.4.25/conf/extra/httpd-vhosts.conf
* httpd-vhosts.conf 기존 내용 제거 후 아래의 내용을 수정 하여 추가 한다.
<VirtualHost *:80>
ServerAdmin admin@test.co.kr
ServerName test.co.kr
ProxyRequests Off
ProxyPass / balancer://mycluster/
ProxyPassReverse / balancer://mycluster
<Proxy balancer://mycluster stickysession=JSESSIONID|jsessionid scolonpathdelim=On>
BalancerMember http://127.0.0.1:8080 route=1
BalancerMember http://127.0.0.1:8081 route=2
</Proxy>
</VirtualHost>
6) Apach2.4 서비스 등록
# vi /etc/init.d/apache
------------------- 파일 내용 // -------------------------
#!/bin/bash
### BEGIN INIT INFO
# Provides: apache
# Required-Start: $remote_fs $syslog
# Required-Stop: $remote_fs $syslog
# Default-Start: 2 3 4 5
# Default-Stop: 0 1 6
# Short-Description: auto start apache web server
# Description: Start Web Server
### END INIT INFO
export APACHE_HOME="/usr/local/apache-2.4.25/"
case $1 in
start)
sh $APACHE_HOME/bin/apachectl -k start
;;
stop)
sh $APACHE_HOME/bin/apachectl -k stop
;;
restart)
sh $APACHE_HOME/bin/apachectl -k stop
sh $APACHE_HOME/bin/apachectl -k start
;;
esac
exit 0
------------------- // 파일 내용 -------------------------
# chmod 755 /etc/init.d/apache
# update-rc.d apache defaults
# chkconfig --add apache
# chkconfig -list | grep -i apache
apache 0:off 1:off 2:on 3:on 4:on 5:on 6:off
# /etc/init.d/apache start
httpd (pid 1771) already running
# ps -ef | grep -i apache
root 670 1 0 15:05 ? 00:00:00 /usr/local/apache-2.4.25/bin/httpd -k start
daemon 671 670 0 15:05 ? 00:00:00 /usr/local/apache-2.4.25/bin/httpd -k start
daemon 672 670 0 15:05 ? 00:00:00 /usr/local/apache-2.4.25/bin/httpd -k start
daemon 674 670 0 15:05 ? 00:00:00 /usr/local/apache-2.4.25/bin/httpd -k start
7) tomcat 사용자 생성
# useradd -m tomcat
# echo 'tomcat:p@ssw0rd' | chpasswd
* 배포판에 따라 chpasswd 명령이 없는 경우 passwd tomcat 명령으로 tomcat 사용자의 비밀번호를 변경 한다.
8) Tomcat 7.0 다운로드 및 환경설정
# su - tomcat
$ cd
$ pwd
/home/tomcat
$ wget http://apache.mirror.cdnetworks.com/tomcat/tomcat-7/v7.0.76/bin/apache-tomcat-7.0.76.tar.gz
8-1)Tomcat 1호기, 2호기 압축 해제 및 시작, 종료 명령 변경
$ tar zxvf apache-tomcat-7.0.76.tar.gz -C apache-tomcat-7.0.76_1
$ tar zxvf apache-tomcat-7.0.76.tar.gz -C apache-tomcat-7.0.76_2
$ mv ~/apache-tomcat-7.0.76_1/bin/startup.sh ~/apache-tomcat-7.0.76_1/bin/startup1.sh
$ mv ~/apache-tomcat-7.0.76_1/bin/shutdown.sh ~/apache-tomcat-7.0.76_1/bin/shutdown1.sh
$ mv ~/apache-tomcat-7.0.76_2/bin/startup.sh ~/apache-tomcat-7.0.76_2/bin/startup2.sh
$ mv ~/apache-tomcat-7.0.76_2/bin/shutdown.sh ~/apache-tomcat-7.0.76_2/bin/shutdown2.sh
8-2) Tomcat 1호기 의 catalina.sh 파일 내용에 추가(절대 경로 입력)
$ cp ~/apache-tomcat-7.0.76_1/bin/catalina.sh ~/apache-tomcat-7.0.76_1/bin/catalina.sh.ori
$ vi ~/apache-tomcat-7.0.76_1/bin/catalina.sh
...중략...
export CATALINA_HOME=/home/tomcat/apache-tomcat-7.0.76_1
export CATALINA_BASE=/home/tomcat/apache-tomcat-7.0.76_1
CATALINA_PID=/home/tomcat/apache-tomcat-7.0.76_1/bin/tomcat.pid
...중략...
8-3) Tomcat 2호기 의 catalina.sh 파일 내용에 추가(절대 경로 입력)
$ cp ~/apache-tomcat-7.0.76_2/bin/catalina.sh ~/apache-tomcat-7.0.76_2/bin/catalina.sh.ori
$ vi ~/apache-tomcat-7.0.76_2/bin/catalina.sh
...중략...
export CATALINA_HOME=/home/tomcat/apache-tomcat-7.0.76_2
export CATALINA_BASE=/home/tomcat/apache-tomcat-7.0.76_2
CATALINA_PID=/home/tomcat/apache-tomcat-7.0.76_2/bin/tomcat.pid
...중략...
8-4) Tomcat 1,2 호기의 시작, 종료 명령을 PATH 에 등록
$ vi ~/.bashrc
...중략...
export JAVA_HOME="/usr/local/jdk1.7.0_80/"
export CATALINA_HOME1=/home/tomcat/apache-tomcat-7.0.76_1
export CATALINA_HOME2=/home/tomcat/apache-tomcat-7.0.76_2
export PATH=$PATH:$JAVA_HOME/bin:$CATALINA_HOME1/bin:$CATALINA_HOME2/bin
...중략...
$ source ~/.bashrc
$ java -version
java version "1.7.0_80"
Java(TM) SE Runtime Environment (build 1.7.0_80-b15)
Java HotSpot(TM) 64-Bit Server VM (build 24.80-b11, mixed mode)
8-5) Tomcat 1호기의 server.xml 파일 수정
$ cp ~/apache-tomcat-7.0.76_1/conf/server.xml ~/apache-tomcat-7.0.76_1/conf/server.xml.ori
$ vi ~/apache-tomcat-7.0.76_1/conf/server.xml
<Server port="8005" shutdown="SHUTDOWN">
... 중략 ...
<Connector port="8080"
protocol="HTTP/1.1"
connectionTimeout="20000"
redirectPort="8443"
disableUploadTimeout="true"
enableLookups="false"
URIEncoding="UTF-8" />
... 중략 ...
<Connector port="8009" protocol="AJP/1.3" redirectPort="8443" />
... 중략 ...
<Engine name="Catalina" defaultHost="localhost" jvmRoute="tomcat1">
... 중략 ...
<!-- 주석 해제 및 아래 내용 추가 -->
<Cluster className="org.apache.catalina.ha.tcp.SimpleTcpCluster" channelSendOptions="5">
<Manager className="org.apache.catalina.ha.session.DeltaManager"
expireSessionsOnShutdown="false"
notifyListenersOnReplication="true"/>
<Channel className="org.apache.catalina.tribes.group.GroupChannel">
<Membership className="org.apache.catalina.tribes.membership.McastService"
address="228.0.0.4"
port="45564"
frequency="500"
dropTime="3000"/>
<Receiver className="org.apache.catalina.tribes.transport.nio.NioReceiver"
address="auto"
port="4000"
autoBind="100"
selectorTimeout="5000"
maxThreads="6"/>
<Sender className="org.apache.catalina.tribes.transport.ReplicationTransmitter">
<Transport className="org.apache.catalina.tribes.transport.nio.PooledParallelSender"/>
</Sender>
<Interceptor className="org.apache.catalina.tribes.group.interceptors.TcpFailureDetector"/>
<Interceptor className="org.apache.catalina.tribes.group.interceptors.MessageDispatch15Interceptor"/>
</Channel>
<Valve className="org.apache.catalina.ha.tcp.ReplicationValve"
filter=".*\.gif|.*\.js|.*\.jpeg|.*\.jpg|.*\.png|.*\.htm|.*\.html|.*\.css|.*\.txt"/>
<Valve className="org.apache.catalina.ha.session.JvmRouteBinderValve"/>
<Deployer className="org.apache.catalina.ha.deploy.FarmWarDeployer"
tempDir="/tmp/war-temp/"
deployDir="/tmp/war-deploy/"
watchDir="/tmp/war-listen/"
watchEnabled="false"/>
<ClusterListener className="org.apache.catalina.ha.session.JvmRouteSessionIDBinderListener" />
<ClusterListener className="org.apache.catalina.ha.session.ClusterSessionListener" />
</Cluster>
8-6) Tomcat 2호기의 server.xml 파일 수정
$ cp ~/apache-tomcat-7.0.76_2/conf/server.xml ~/apache-tomcat-7.0.76_2/conf/server.xml.ori
$ vi ~/apache-tomcat-7.0.76_2/conf/server.xml
<Server port="8006" shutdown="SHUTDOWN">
... 중략 ...
<Connector port="8081"
protocol="HTTP/1.1"
connectionTimeout="20000"
redirectPort="8443"
disableUploadTimeout="true"
enableLookups="false"
URIEncoding="UTF-8" />
... 중략 ...
<Connector port="8010" protocol="AJP/1.3" redirectPort="8443" />
... 중략 ...
<Engine name="Catalina" defaultHost="localhost" jvmRoute="tomcat2">
... 중략 ...
<!-- 주석 해제 및 아래 내용 추가 -->
<Cluster className="org.apache.catalina.ha.tcp.SimpleTcpCluster" channelSendOptions="5">
<Manager className="org.apache.catalina.ha.session.DeltaManager"
expireSessionsOnShutdown="false"
notifyListenersOnReplication="true"/>
<Channel className="org.apache.catalina.tribes.group.GroupChannel">
<Membership className="org.apache.catalina.tribes.membership.McastService"
address="228.0.0.4"
port="45564"
frequency="500"
dropTime="3000"/>
<Receiver className="org.apache.catalina.tribes.transport.nio.NioReceiver"
address="auto"
port="4001"
autoBind="100"
selectorTimeout="5000"
maxThreads="6"/>
<Sender className="org.apache.catalina.tribes.transport.ReplicationTransmitter">
<Transport className="org.apache.catalina.tribes.transport.nio.PooledParallelSender"/>
</Sender>
<Interceptor className="org.apache.catalina.tribes.group.interceptors.TcpFailureDetector"/>
<Interceptor className="org.apache.catalina.tribes.group.interceptors.MessageDispatch15Interceptor"/>
</Channel>
<Valve className="org.apache.catalina.ha.tcp.ReplicationValve"
filter=".*\.gif|.*\.js|.*\.jpeg|.*\.jpg|.*\.png|.*\.htm|.*\.html|.*\.css|.*\.txt"/>
<Valve className="org.apache.catalina.ha.session.JvmRouteBinderValve"/>
<Deployer className="org.apache.catalina.ha.deploy.FarmWarDeployer"
tempDir="/tmp/war-temp/"
deployDir="/tmp/war-deploy/"
watchDir="/tmp/war-listen/"
watchEnabled="false"/>
<ClusterListener className="org.apache.catalina.ha.session.JvmRouteSessionIDBinderListener" />
<ClusterListener className="org.apache.catalina.ha.session.ClusterSessionListener" />
</Cluster>
8-7) Tomcat 1,2 호기 시작 테스트
$ startup1.sh
Using CATALINA_BASE: /home/tomcat/apache-tomcat-7.0.76_1
Using CATALINA_HOME: /home/tomcat/apache-tomcat-7.0.76_1
Using CATALINA_TMPDIR: /home/tomcat/apache-tomcat-7.0.76_1/temp
Using JRE_HOME: /usr/local/jdk1.7.0_80/
Using CLASSPATH: /home/tomcat/apache-tomcat-7.0.76_1/bin/bootstrap.jar:/home/tomcat/apache-tomcat-7.0.76_1/bin/tomcat-juli.jar
Tomcat started.
$ startup2.sh
Using CATALINA_BASE: /home/tomcat/apache-tomcat-7.0.76_2
Using CATALINA_HOME: /home/tomcat/apache-tomcat-7.0.76_2
Using CATALINA_TMPDIR: /home/tomcat/apache-tomcat-7.0.76_2/temp
Using JRE_HOME: /usr/local/jdk1.7.0_80/
Using CLASSPATH: /home/tomcat/apache-tomcat-7.0.76_2/bin/bootstrap.jar:/home/tomcat/apache-tomcat-7.0.76_2/bin/tomcat-juli.jar
Tomcat started.
* 브라우저를 이용하여 http://192.168.0.1:8080, http://192.168.0.1:8081 에 접속하여 본다.
8-8) Tomcat 1,2 호기 종료 테스트
$ shutdown1.sh
Using CATALINA_BASE: /home/tomcat/apache-tomcat-7.0.76_1
Using CATALINA_HOME: /home/tomcat/apache-tomcat-7.0.76_1
Using CATALINA_TMPDIR: /home/tomcat/apache-tomcat-7.0.76_1/temp
Using JRE_HOME: /usr/local/jdk1.7.0_80/
Using CLASSPATH: /home/tomcat/apache-tomcat-7.0.76_1/bin/bootstrap.jar:/home/tomcat/apache-tomcat-7.0.76_1/bin/tomcat-juli.jar
$ shutdown2.sh
Using CATALINA_BASE: /home/tomcat/apache-tomcat-7.0.76_2
Using CATALINA_HOME: /home/tomcat/apache-tomcat-7.0.76_2
Using CATALINA_TMPDIR: /home/tomcat/apache-tomcat-7.0.76_2/temp
Using JRE_HOME: /usr/local/jdk1.7.0_80/
Using CLASSPATH: /home/tomcat/apache-tomcat-7.0.76_2/bin/bootstrap.jar:/home/tomcat/apache-tomcat-7.0.76_2/bin/tomcat-juli.jar
8-9) Tomcat 메니져 사용을 위한 설정 부분(필수 아님)
* 이 문서에서는 나중에 jenkins 사용을 위해 설정 하였다.
$ cp ~/apache-tomcat-7.0.76_1/conf/tomcat-users.xml ~/apache-tomcat-7.0.76_1/conf/tomcat-users.xml.ori
$ cp ~/apache-tomcat-7.0.76_2/conf/tomcat-users.xml ~/apache-tomcat-7.0.76_2/conf/tomcat-users.xml.ori
$ vi ~/apache-tomcat-7.0.76_1/conf/tomcat-users.xml
...중략...
<!-- 아래의 내용을 추가 한다 -->
<role rolename="manager-gui"/>
<role rolename="manager-script"/>
<role rolename="manager-status"/>
<role rolename="manager-gui"/>
<user username="tomcat" password="p@ssW0rd" roles="manager-gui, manager-script, manager-status, manager-gui"/>
$ vi ~/apache-tomcat-7.0.76_2/conf/tomcat-users.xml
...중략...
<!-- 아래의 내용을 추가 한다 -->
<role rolename="manager-gui"/>
<role rolename="manager-script"/>
<role rolename="manager-status"/>
<role rolename="manager-gui"/>
<user username="tomcat" password="p@ssW0rd" roles="manager-gui, manager-script, manager-status, manager-gui"/>
9) Tomcat 1,2 호기 서비스 등록
# vi /etc/init.d/tomcat
------------------- 파일 내용 // -------------------------
#!/bin/bash
### BEGIN INIT INFO
# Provides: Tomcat1
# Required-Start: $remote_fs $syslog
# Required-Stop: $remote_fs $syslog
# Default-Start: 2 3 4 5
# Default-Stop: 0 1 6
# Short-Description: Auto Start Tomcat1 Server
# Description: Start Web Application Server
### END INIT INFO
export CATALINA_HOME="/home/jhkim1981/tomcat/apache-tomcat-7.0.76_1"
case $1 in
start)
su - tomcat -c $CATALINA_HOME/bin/startup1.sh
;;
stop)
su - tomcat -c $CATALINA_HOME/bin/shutdown1.sh
;;
restart)
su - tomcat -c $CATALINA_HOME/bin/shutdown1.sh
su - tomcat -c $CATALINA_HOME/bin/startup1.sh
;;
esac
exit 0
------------------- // 파일 내용 -------------------------
# vi /etc/init.d/tomcat2
------------------- 파일 내용 // -------------------------
#!/bin/bash
### BEGIN INIT INFO
# Provides: Tomcat2
# Required-Start: $remote_fs $syslog
# Required-Stop: $remote_fs $syslog
# Default-Start: 2 3 4 5
# Default-Stop: 0 1 6
# Short-Description: Auto Start Tomcat2 Server
# Description: Start Web Application Server
### END INIT INFO
export CATALINA_HOME="/home/jhkim1981/tomcat/apache-tomcat-7.0.76_2"
case $1 in
start)
su - tomcat -c $CATALINA_HOME/bin/startup1.sh
;;
stop)
su - tomcat -c $CATALINA_HOME/bin/shutdown1.sh
;;
restart)
su - tomcat -c $CATALINA_HOME/bin/shutdown1.sh
su - tomcat -c $CATALINA_HOME/bin/startup1.sh
;;
esac
exit 0
------------------- // 파일 내용 -------------------------
# chmod 755 /etc/init.d/tomcat1
# chmod 755 /etc/init.d/tomcat2
# update-rc.d tomcat1 defaults
# update-rc.d tomcat2 defaults
# chkconfig --add tomcat1
# chkconfig --add tomcat2
# chkconfig -list | grep -i tomcat
tomcat1 0:off 1:off 2:on 3:on 4:on 5:on 6:off
tomcat2 0:off 1:off 2:on 3:on 4:on 5:on 6:off
# /etc/init.d/tomcat1 start
Using CATALINA_BASE: /home/tomcat/apache-tomcat-7.0.76_1
Using CATALINA_HOME: /home/tomcat/apache-tomcat-7.0.76_1
Using CATALINA_TMPDIR: /home/tomcat/apache-tomcat-7.0.76_1/temp
Using JRE_HOME: /usr/local/jdk1.7.0_80/
Using CLASSPATH: /home/tomcat/apache-tomcat-7.0.76_1/bin/bootstrap.jar:/home/tomcat/apache-tomcat-7.0.76_1/bin/tomcat-juli.jar
Using CATALINA_PID: /home/tomcat/apache-tomcat-7.0.76_1/bin/tomcat.pid
Tomcat started.
# /etc/init.d/tomcat2 start
Using CATALINA_BASE: /home/tomcat/apache-tomcat-7.0.76_2
Using CATALINA_HOME: /home/tomcat/apache-tomcat-7.0.76_2
Using CATALINA_TMPDIR: /home/tomcat/apache-tomcat-7.0.76_2/temp
Using JRE_HOME: /usr/local/jdk1.7.0_80/
Using CLASSPATH: /home/tomcat/apache-tomcat-7.0.76_2/bin/bootstrap.jar:/home/tomcat/apache-tomcat-7.0.76_2/bin/tomcat-juli.jar
Using CATALINA_PID: /home/tomcat/apache-tomcat-7.0.76_2/bin/tomcat.pid
Tomcat started.
# ps -ef | grep -i tomcat
tomcat 899 1 9 14:43 ? 00:00:10 /usr/local/jdk1.7.0_80//bin/java -Djava.util.logging.config.file=/home/tomcat/apache-tomcat-7.0.76_2/conf/logging.properties -Djava.util.logging.manager=org.apache.juli.ClassLoaderLogManager -Djdk.tls.ephemeralDHKeySize=2048 -Djava.endorsed.dirs=/home/tomcat/apache-tomcat-7.0.76_2/endorsed -classpath /home/tomcat/apache-tomcat-7.0.76_2/bin/bootstrap.jar:/home/tomcat/apache-tomcat-7.0.76_2/bin/tomcat-juli.jar -Dcatalina.base=/home/tomcat/apache-tomcat-7.0.76_2 -Dcatalina.home=/home/tomcat/apache-tomcat-7.0.76_2 -Djava.io.tmpdir=/home/tomcat/apache-tomcat-7.0.76_2/temp org.apache.catalina.startup.Bootstrap start
tomcat 910 1 8 14:43 ? 00:00:08 /usr/local/jdk1.7.0_80//bin/java -Djava.util.logging.config.file=/home/tomcat/apache-tomcat-7.0.76_1/conf/logging.properties -Djava.util.logging.manager=org.apache.juli.ClassLoaderLogManager -Djdk.tls.ephemeralDHKeySize=2048 -Djava.endorsed.dirs=/home/tomcat/apache-tomcat-7.0.76_1/endorsed -classpath /home/tomcat/apache-tomcat-7.0.76_1/bin/bootstrap.jar:/home/tomcat/apache-tomcat-7.0.76_1/bin/tomcat-juli.jar -Dcatalina.base=/home/tomcat/apache-tomcat-7.0.76_1 -Dcatalina.home=/home/tomcat/apache-tomcat-7.0.76_1 -Djava.io.tmpdir=/home/tomcat/apache-tomcat-7.0.76_1/temp org.apache.catalina.startup.Bootstrap start
10) 웹 어플리케이션 배포시...
* 배포하는 WEB Applicaion 의 web.xml 에 <distributable /> 추가 한다.
<%@ page session="true" %>
<%= session.getId() %>
jsp 페이지에 위의 내용을 넣고 세션 아이디를 확인해 본다.
2017년 3월 23일 목요일
[EtC] log4j log level
로그레벨은
TRACE > DEBUG > INFO > WARN > ERROR > FATAL 순 입니다.
# Log Level
# TRACE : 추적 레벨은 Debug보다 좀더 상세한 정보를 나타냄
# DEBUG : 프로그램을 디버깅하기 위한 정보 지정
# INFO : 상태변경과 같은 정보성 메시지를 나타냄
# WARN : 처리 가능한 문제, 향후 시스템 에러의 원인이 될 수 있는 경고성 메시지를 나타냄
# ERROR : 요청을 처리하는 중 문제가 발생한 경우
# FATAL : 아주 심각한 에러가 발생한 상태, 시스템적으로 심각한 문제가 발생해서 어플리케이션 작동이 불가능할 경우
# TRACE : 추적 레벨은 Debug보다 좀더 상세한 정보를 나타냄
# DEBUG : 프로그램을 디버깅하기 위한 정보 지정
# INFO : 상태변경과 같은 정보성 메시지를 나타냄
# WARN : 처리 가능한 문제, 향후 시스템 에러의 원인이 될 수 있는 경고성 메시지를 나타냄
# ERROR : 요청을 처리하는 중 문제가 발생한 경우
# FATAL : 아주 심각한 에러가 발생한 상태, 시스템적으로 심각한 문제가 발생해서 어플리케이션 작동이 불가능할 경우
출처: http://mdj1234.tistory.com/63 [짬타이거 화이팅!]
피드 구독하기:
글
(Atom)